Wednesday, December 12, 2012

Dresser makeover

As promised, I have another baby's room project to share with you.

Almost every piece of furniture in the baby's room was donated to us by our amazing friends.  This dresser was a welcomed addition because we needed a dresser before we could be certified as foster/adoptive parents.

It's a nice, sturdy dresser in great condition.  My only issue is that I like things to have a bit of pizzaz!  I knew immediately that I wanted to paint this guy.

I've actually never painted a large piece of furniture before and it was much more work than I anticipated.

I began by priming the entire unit.

I removed all the knobs and removed the drawers and put primer on everything that would be visible.

Then I painted the whole thing yellow!  I started to stress out when I began painting because I could still see the white primer through the paint.  Then I remember I can paint another coat.  Duh!  So after the first coat of paint dried, I started on the second.  The entire project took me about 5 hours because, including the primer, I basically had to paint the dresser three times.

But let me tell you friends, it was totally worth the time and effort.

I am in love with this dresser.  It's exactly what I wanted.

Rather than using the plain knobs it came with, I added this lovely hardware that I picked up on sale at World Market. 

Now that we have our crib and dresser, we just need a baby!
This kid already has cooler bedroom furniture than my husband and I have.  In fact, I think this is my favorite room in the house.


Tuesday, December 4, 2012

Cloud Parade

I'd like to introduce you all to an absolutely genius idea.  Please watch this brief video and find out about an exciting new development in wedding planning.


Amazing, right?!  You want to know the most exciting part for me???  I have a shop on Cloud Parade!  

I'll be selling my jewelry and hair accessories to creative and interesting brides.  

The website launches soon!  I'll be sure to update you!

Monday, November 26, 2012

Saturday, November 24, 2012

Purple pants

I have pants issues.  My hips are wide and my legs are short and stores just don't sell pants for humans like me.  Skinny jeans can be especially difficult but there's NO WAY you'd catch me in a pair of flare jeans.  Not with this body type.  Allow me to show you.
Obviously pre-hair and make-up


I bought these jeans from a friend for $5.00.  They're quality jeans and the waist and hips fit great.  That's really all I needed knowing that I always have to do some kind of work to my pants.  My plan was to make them straight (almost skinny) legs and take up the length, of course.

To start I pulled out a pair of jeans that fit me perfectly.  I turned the flare jeans inside out and lay the perfectly fitted jeans on top.

I pinned along the sides where they needed to be sewn and cut off the length.  I created my new seams and new hems and had a new pair of perfectly fitted jeans.

It wasn't enough, though.  

I decided I wanted yellow jeans.  Boy do I love the color yellow.  I purchased a box of golden yellow Rit Dye just for the occasion.

Before I could dye them yellow I had to bleach them.  I bleached them twice, allowing them to sit in the sink for an hour at a time with each bleaching and this is the best I could do.

I was a little disappointed and a lot annoyed by the amount of time it was taking so I finally decided to get on with the dye-ing.  I ran a rinse cycle first, to completely rinse the bleach from the jeans, then I put them into the washer with hot water, golden yellow Rit Dye, and a cup of salt.  

I should have known better.  Without completely lifting the blue, the golden yellow just turned the jeans yellowish green.  

I started to panic.

Then I remembered that I had a half bottle of purple dye that I'd used on another project.  I emptied the bottle into the washer, having no idea what to expect.

Ladies and gentlemen my impulsivity paid off.  I absolutely love my new jeans!  The results were better than anything I could have done on purpose.

The color is crazy.  I can barely describe it.  There are bits of blue remaining and all different shades of purple.  Be sure to click on the picture so it will enlarge and you can really take a look at the pretty colors.


Once again, like everything else in life, things did not turn out as I planned, but so much better.

I'd also like the before and after pictures to serve as a reminder of how drastically properly fitted clothes and styled hair/ make-up can change a person's appearance.  Yikes!

Thanks for stopping by, friends :)


Saturday, November 17, 2012

The News

I mentioned in my last post that there are new developments in my life that have kept me from having the time to blog.  Well, ladies and gentlemen, I'm ready to let you in on my little secret.

We've spent the last several months taking the steps necessary to bring a baby into our life.  

I'm not pregnant, by the way.

Sometime in April my husband and I made the difficult and exciting decision to adopt a child.  We had no idea where to begin but we knew we had been ready for a child for several years and we were finally open to the idea of raising a child that was not made from our own DNA.  

It's such a huge shift in thinking.  The name of my blog, REcreation Station, continues to take on new meaning all the time.  This decision has meant allowing God to change our hearts and our desires.  Throughout this process, it's become so much less about fulfilling our own hopes and dreams of parenthood, and so much more about blessing the crap out of a kid!

After quite a bit of research, we decided in early June that we would adopt from the foster care system. We honestly had no idea what we were getting ourselves into but it seemed like the best option for our family.  Since June we've taken several classes, had our home inspected, filled out piles of paperwork, had medical examinations, finger prints, given all our personal history to people we've just met, and it's been incredible.  We absolutely love everything about the agency we're using.  We feel completely supported and appreciated at all times.  We know that once we start dealing with the county things will probably change a bit, but for now we're totally satisfied.

We should be a certified foster/adoptive home in less than a month and then we could have a baby placed in our home any time after.

Because of the sensitive nature of fostering a child, I won't be posting any pictures here until after an adoption is finalized.  I also won't be giving any specific dates about when the child is placed in our home or any court date related information.

Now let me tell you what WILL happen.  Over the next few weeks there are numerous projects I'll be working on to complete the baby's room.  I plan to post pictures here.  For now, I'll give you a peek at what's already happened.

This amazing banner was made by my lovely friend Megan.  She's the bomb.  You can see in the picture above that it's hanging over the crib.  

This piece of art is also hanging over the crib.  AND it was also made by Megan.  The verse is perfect and very personal to us.

Now for something I actually made.  I put these curtains together using fabric I found at a garage sale for $1.  I bought the fabric last year and have been hanging onto it until I could find the right use because it's so special.  

I made the curtains simple, just to frame the window.  They don't cover the window completely.  I just tied strips of burlap around them for a little character and they're just what I hoped they'd be.

So be on the lookout for more frequent blog posts about new projects for the baby's room, new outfits for myself, and venting about the crazy stress and joy that will surely come along with parenthood.

Your payers are much appreciated!


Sunday, October 7, 2012

Gah! I've been gone for so long!

Welp.  It's been over two months since my last post.  Know what's been happening?  Life.
There are some really big things happening in my life right now.  I plan to share soon.  In the mean time I thought you all might like to see a couple of things put I together.

I found some awesome, striped, knit fabric a few months back at a thrift store.  I think I paid $1 for it all.  I knew I'd make a skirt out of it.  I just didn't get around to it until now.

It was a very simple project.  I used a basic skirt pattern to get the shape and size right, but I probably didn't even need the pattern.
Always ready to help

Instead of the draw-string waist in the pattern, I created an elastic waistband.

The whole project took me less than an hour and I'm quite pleased.


It's a total budget outfit, too.  I paid $1 for the skirt fabric, $1 for the button-up denim shirt at a garage sale, $6 for the tank at H&M, $1 for the necklace at Wal-Mart, and I got the shoes at Payless a few years ago.  I can't remember how much they were, but it was back when buying shoes at Payless actually meant you would pay less.


I'd also like to show you this adorable dress I picked up at a thrift store for $5.

I didn't have to make any adjustments.  I just paired it with the $3 shoes I bought at Salvation Army thrift store and a $7 belt from Target.

I LOVE this dress.  I just suits me, you know?

P.S.  I really don't know how the heck a person is supposed to stand in these pictures.  I feel like a big goober trying to pick out pictures to post on my blog.  I try and find the least ridiculous pictures and I go with those.

P.P.S. (if that's a thing)
I'm going to make a real effort to post a bit more.  Although I have a lot going on right now, it's really cool stuff and I think my blog is a great place to share about my new journey. 

Keep checking in! 


Friday, July 27, 2012

More maxi please

Oh friends.  I may be turning over a new fashion leaf.  (Is there such a thing as a "fashion leaf?")

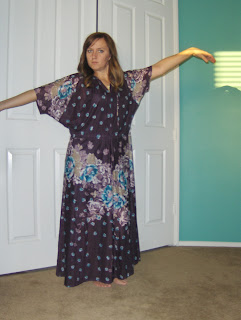
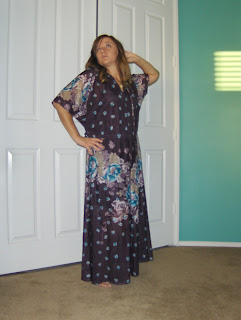
I'm really starting to like this maxi dress business.  When I'm wearing a long dress I feel like some sort of woodland princess.  You know, like I could go out and frolic in the forest with the faeries.  It's kind of magical.

I got this dress a few months ago.  I think I paid $3.

I also think it may have been a night gown. It's totally sheer, which is why the first round of picture I took will not be displayed on this here blog.  I definitely put a slip on once I realized what was happening.

I love the colors and the pretty flowers.  I was drawn to it immediately.

I really hummed and hawed over what to do with this piece.  Eventually I just decided simple is better.  All I did was take in the sides and the sleeves.
I also added a belt, because belts make everything better.


Pretty, right?

Now if only I could find a forest to frolic in...


Wednesday, July 25, 2012

Quick One

Got it for 2 bucks at Goodwill.

Cut off the sleeves and took in the sides.

Wore it to work today.


P.S.  All items in this outfit, except the shoes and earrings, were thrifted.  Thrifted top, thrifted skirt, thrifted belt, thrifted necklace.   Thrifty, thrifty, thrifty!

Tuesday, July 17, 2012

Hippy Chic

I broke a rule, friends.  I must confess.  I've told you a few times, being the shorty that I am, wearing skirts and dresses below the knee just isn't flattering.  It makes me look stinkin' short.  Which I am, but there's no need to bring attention to the matter.  
Anyhow, I've held fast to this rule for a good few years.  Then I came across this dress.

I got it for $4 at the Goodwill.  There's a Goodwill around the corner from my job.  It's bad news.  Or good news, depending on your perspective.

My original plan was to remove the sleeves, take in the bodice, and shorten the skirt.  Well, as we all know, my plans often change.  I removed the sleeves and took in the bodice.

But when I tried it on the check out the length, I fell in love.

I may look short in this dress, but I also look like a hippy princess.  What could be wrong with that!?


And what hippy dress would be complete without a big, floppy hat?

Certainly a summer favorite.


Sunday, July 8, 2012

Homemade Laundry Detergent

A couple months back I told you all about my homemade body scrub; which I'm still using and absolutely love!  In that same post I wrote that I'd be doing more tutorials on natural items.  Well, I'm keeping my word and today I'd like to tell you a bit about homemade laundry detergent.

I've told you before that I like to save money wherever I can.  I also like to avoid harsh, unnatural chemicals as much as possible.  This laundry detergent gives me the best of both worlds!

I've seen lots of laundry detergent recipes out there.  Many are very good.  This is the one I've chosen to use and so for it's been great.


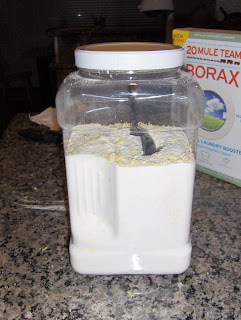
You'll need a 4 lb. box of Borax, a 4 lb. box of Baking Soda, a 3 lb. box of Washing Soda, and 3 bars of Fels Naptha soap (grated).  You can actually use any bar soap you'd like.  I just love the smell of Fels Naptha and it's specifically made for laundry.

You just throw it all together and mix it up.


Now you may notice that my container seems a little small for all those ingredients.  I actually split the recipe in half, simply because of the size of the container I have.  Cutting it in half means I spent about $5 all together on this batch of detergent.  The last batch I made (also a half batch) lasted me 6 months.  This averages out to less than $1 per month on laundry detergent.  Can you believe it!?!?  I'm only doing laundry for two people, so those of you with children or more people in the house will probably use it up quicker, but it's still going to be an incredible bargain.

I use a 2 tablespoon scoop and usually use warm water, just to make sure everything dissolves well.  I haven't had any issues at all with residue.  My clothes are clean every time and they smell great!


Tuesday, July 3, 2012

So many pictures. So few words.

Two years ago I bought this dress.

Last year I turned it into this skirt.  But I never really liked the skirt very much.

Two or three years ago I bought this dress.

Last year I removed the bodice and started wearing it as a skirt.

No picture.

Last weekend I cleaned out my sewing closet and found the bodice.  I remembered the skirt that I didn't like very much and decided it was time the two became one.

I made a dress.


I wore this dress today.  I like it very much.

The end.


Saturday, June 16, 2012

Orange you glad I didn't say banana?

Eek!  It's been a month since I lasted blogged.  Where has the time gone!?  Well, I whipped up a little somethin' somethin' last night that I want to share with you.

I picked up the original dress at a garage sale for $1.00

Sweet, right?

I've ho-hummed over what to do with this piece.  It was kind of fun as a dress but I finally decided I need more summer tops.  Plus, after making the top, I had the entire bottom left to make a skirt (later).

So I started by cutting the dress in half.

Then I cute the sleeves off.  Rather than seam rip (which I hate more than anything) I just cut those sleeves right off!  Even if they fray a little after washing, I really don't mind.  It adds to the character.  Or at least that's what I tell myself when I don't want to spend my entire night seam ripping.

Then I hemmed the bottom and took the sides in quite a bit and I was done.

I'm wearing the top as I type this blog.  I love it!  My husband complimented me immediately this morning so I know it's a winner.

I'm feelin' a little 60s style today, which I'm totally okay with.

What fun!

Now here's the full outfit rundown:
Top: $1 - garage sale and altered
Jeans: $11 - Forever 21
Shoes $3 - thrift store
Necklace $0 - gift
Headband $0 - scrap fabric