Monday, December 20, 2010

Sweater to scarf

This item was inspired by this blog.  She does some really amazing stuff and I'm kind of obsessed with her blog.  I saw a tutorial of hers not long ago and decided I wanted to give it a shot.

It began with this red, sweater-vest.


I used the back and cut out as much square area as possible.


Then I cut the piece in half, lengthwise.
Rambo is such a good helper


Then I sewed the two pieces together, leaving one end open.  I inverted the newly sewn scarf so the seams were on the inside.  Then I added two buttons to connect the ends.  No button holes necessary because it's big enough to slide over my head.


This was so easy and so cute that I want to make about 1,000 more!

Sunday, December 12, 2010

Hat makeover!

Today's post is a little picture-heavy.  Bear with me.

I was super excited when I found this dress at a thrift store for $2.00.  Oh the possibilities!


It wasn't until I got it home and washed that I realized it had this giant stain on the front.


So I knew there really wasn't any possibility for this dress to remain a dress.  But I found a use for the rest of the bottom half when I found this pillbox hat.


I bought it from an antique store for $6.00.  It had some stains and was coming apart on the inside.  I'm sure that's why it was so inexpensive.  All of the other pillbox hats were at least $10.00.   I wasn't sure what I would do with it at first but once the wheels started turning I got super excited.


The first order of business was to use some tacky glue to reattach the inside band to the hat.

Then I cut the dress in half to use to parts of the fabric that were not stained.
First I used the fabric to cut out a circle and glued it to the top of the hat to cover some of the stains.
I had to make a small slit in the fabric so it would lay flat when I glued it.
Next I made this fancy decoration for the front of the hat.
For the flower/bow I gather a wide strip of black tulle and tied a ribbon in the center.  Then I created a rosette using more fabric from the dress.  Next I sewed a jewel button in the center.  Finally I hot glued it all together and then to the hat.

View from above, as most of you usually see me :)
I am thrilled with how this hat turned out.  I'm not quite sure where I'll be wearing yet, but a hat like this can't be kept in the closet!

Sunday, December 5, 2010

Another twofer

This first item I wore for Thanksgiving but forgot to take a picture for the blog.  It wasn't until today that I finally decided to put it back on to show you all.  It's not that I don't like it; actually I love it.  I guess I've just been a busy girl.

Here's what it looked like before.


I bought this dress from a local thrift store for $2.50.  The print and colors totally drew me in.  It looked pretty sad once I had it on though.  The shape was just terrible.  And once again, the length was totally inappropriate for my height.

The first thing I did was take up the length.
On the left side of the picture you can see a preview of a future post.


Then I took in the sides.  That was about it.  The dress really just needed a bit of reshaping.  Nothing major.  I am incredibly pleased with the results.


This is the outfit I wore on Thanksgiving.  I am quite thankful for this dress.  I'm also thankful for God giving me the new boldness and creativity.  It's been incredible.

The next item was another one bought with my "gift certificate" to the thrift store.  It's nothing special but it caught my eye a couple of times when I was there so I finally bought it.  I think it's probably just because it reminds me of an old sweater one of my friends had when we were in middle school.
Even my face was bummed.


It was big, sad, and frumpy.  There wasn't much I could do with it other than take it in.  So I got to it, which took about 10 minutes.  I put it back on and it fit great but it was still too boring for my taste.  I decided to make a broach to wear with the recreated sweater.  I used my newly acquired skills for fabric rosette making and put this pretty, little thing together.


I attached the rosette to the sweater with a safety pin and I was done.


I am pleased.  I think I'll wear it to work tomorrow!

Saturday, December 4, 2010

Sorry...

for neglecting my blog.  I've been working on a lot of Christmas projects, including gifts.  For those of you receiving Christmas gifts from me, it's best that I don't post that stuff on my blog lest I ruin the surprise.  However, there is some thing exciting coming up.  I'm going to prepare an outfit for my husband's work Christmas party.  To keep you interested, I'll tell you it involves recreating a pill box hat!  Please keep checking in because I certainly haven't stopped reworking stuff.

Monday, November 22, 2010

Earrings from a shirt?! Now that's just crazy.

I once bought a shirt for a quarter.  It looked like this...


When I "recreated" the shirt I removed the sleeves, but I didn't throw them away because they had lovely embroidery on the ends.  I cut off the embroidered ends, unsure of how I'd use them.


Then it hit me...earrings!  I love earrings and how wonderful it would be to have pink, embroidered earrings!  So I cut out two individual flowers, added an earring hook to each, and sewed three clear beads to the centers.

Here they are!  Embroidered, fabric, beaded earrings.


And this is how they look on ears.


The best part is that earrings this large usually weigh my ears down and sometimes make them tender.  Not fabric earrings!  Oh the fun of fabric :)

Saturday, November 13, 2010

Double Whammy

This lovely vest came into my life after another trip to the thrift store near work.  My wonderful sister-in-law gave me a "gift certificate" for my birthday so I felt comfortable spending a little more than usual.  I think this one was $3.00.
I don't know why I make these faces


It was obviously too big, but I really liked the orange tie-die action.  I also liked the lacey trim, which you can't quite see in this picture.  There wasn't too much that needed to be done and somehow I managed to get through the process without taking any pictures.  Oops!  All I really did though was take it in on the sides and I removed what I might call the sleeves and then hemmed it up.  That's it!


Since the weather has been a bit cooler, I do need to wear it with a t-shirt, but I think in the summer it will be cute as a tank top, or open with a tank top underneath.  So many possibilities!

The second top I wanted to show you I forgot to take a picture of before I got started.  I actually did this one a few weeks ago but haven't posted it yet.  The shirt used to be giant (like most things I start with).  The only change I made was to take it in quite a bit.  Now it looks like this.


Thanks for checking in on my blog.  If you like something, please leave a comment.  It makes my heart happy :)  Even if all you say each time is "that's cute!"  I still appreciate your words.

Friday, November 5, 2010

Oh dear

I know what you're thinking; "how could this possible turn into anything worth wearing?"  At least that's what I was thinking when I brought it home and tried it on.


I honestly can't tell you why I picked it up.  I think it had something to do with the print but everything else about it was completely wrong.  It was obviously way too big, the shape was sad and unflattering, and its probably not the best color for me.  So needless the say, this dress called for a major overhaul.

First order of business was to take it in...big time.
All pinned up


Next I decided to get rid of the sleeves.  I tried it on after taking it in and the sleeves just weren't working out.


After that I took off A LOT of the length.  It wasn't happening as a dress.  Rambo supervised.


Finally I added the missing, center button.


I tied a red chord around my waist to give my new top a little shape and viola!


Wow.  I really wasn't sure about this one but I think it came out looking good.  At least good enough for my weekly trip to Trader Joe's and the local produce stand.

Tuesday, November 2, 2010

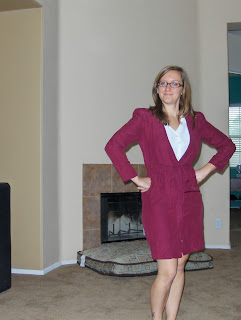
Dress to jacket

When I bought this dress (for $1.25 at a thrift store) I thought I could just remove the vest and shoulder pads, wear it with a cami, and be on my way.  Not so.

Powerful business woman circa 1985


Once I got it home and tried it on, I found that it was too snug around the hip/buttocks region.  This discovery forced me to get creative.  I began by removing the vest and shoulder pads which had to go regardless of my recreation plans.


Then I made a drastic decision; this dress was going to become a jacket.  I guess it's not really that drastic.  I just had to make it shorter.  But I wasn't certain how it would look as a jacket and once I cut the skirt off, there was no going back.  Fortunately everything worked out quite nicely.

Hello jacket!


I'm calling this my "voting jacket" as I felt very smart wearing this jacket to the polling place this morning.  You may also notice that I made another ruffle necklace.  So much fun!

Sunday, October 31, 2010

Ruffle Necklace

I found a tutorial online yesterday that said making these adorable, ruffle necklaces was simple and quick.  They were right!


I had no idea how easy this would be.  I had everything at home that I needed, including scrap fabric of course.  This necklace really was so simple and adorable I want to make 100 more!   Don't be surprised if you get one for Christmas. :)
Close up

Wednesday, October 20, 2010

This ain't yo mama's denim jumper

Ok, well I suppose it could have been at one point, considering I bought it second hand.  But it ain't you mama's denim jumper no mo!


This was another $0.59 purchase.  I imagine your mom wearing it with a t-shirt underneath and her favorite clogs...maybe even those gray, wool socks.  Not anymore!  It took me a while but I finally decided what to do with this dress.  First, I had to get rid of the collar.

Hooray for my new dress form!


Next, I took in the sides and took off about 7 inches of length.  It was cold and rainy today so I wore my new jumper with leggings, and my new boots.


Much better, I'd say!

Sunday, October 17, 2010

I am sorry to report...

I did not make anything new for my birthday weekend.  It was just too busy.  However, I had a wonderful 28th birthday :)

Tuesday, October 12, 2010

Work Attire

I was in need (want) of something to wear to work.  This skirt caught my eye.


It was another $0.59 item from the thrift store near work.  Nothing terribly exciting.  Just a cream colored, high waisted skirt.

There were just a couple of changes to be made.  First: it was missing a button on the waist so I added one from my collection.


Second: I needed to take off some length so as not to make this 5'1" girl look any shorter.


And that was it!  I wore it with a plumb colored top from Forever 21 and my clearance wedges from Target and I was set for a day of teaching and therapizing (that's not really a word).

Pockets!

Sunday, October 10, 2010

Party Dress

Today we gave a surprise party for my mother-in-law's 50th birthday.  I knew I'd need something special for this occasion and I believe I found just the thing.

I bought this dress last week for $1.25 at my local thrift store.


I liked the color and the shape.  It definitely had potential.  I didn't like the giant shoulder pads and the awkward length.  I find that most dresses are made for taller women.  I am not one of those women.

I removed the shoulder pads and took in the bodice and skirt about 3 inches.  I knew it would be a hot day so the 3/4 sleeves just would not do.


I went back and forth on the neckline and finally decided to create a v-neck.  I took 5 inches off the bottom as well!

The final product:

Obviously, I was my own photographer.


It turned out to be a great dress.  It feels a little more grown up than I'm used to, but I guess that's alright since I'll be 28 this week.

Oh, I almost forgot...I think the dress goes well with my new hair, don't you? :)

Saturday, October 2, 2010

Ack!


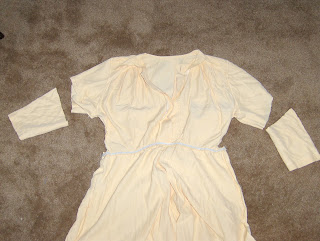
I know what you're thinking.  "How on earth could she do anything with this monstrosity of a dress?"  Well, I was thinking the same thing when I started.  I really wasn't sure where I was going.  This dress was completely out of control.  I'm actually a little embarrassed to show you this picture as it's completely unbecoming.

I began by removing the should pads.  That was a no-brainer.

Look at the size of that thing!


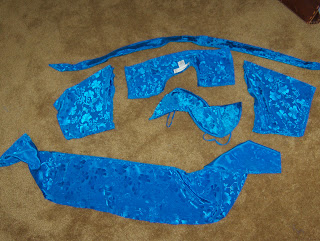
Then I quickly realized the top portion of the dress had entirely too much going on.  By the time I was done removing things, I had almost completely disassembled the dress.  These are the extra parts.


I got rid of the shoulder pads, THE SHOULDERS, the sleeves, the collar, and 8 inches off the bottom.  The entire project took me a week because (a) I was busy, and (b) the dress overwhelmed me.  Today I finished the final stitching and I'm feeling pretty good about it.

Hooray for pockets!


Even though I only paid $0.59 for the dress, it seems kind of fancy so I'm not sure yet where I'm going to wear it.  But I guess whenever that special occasion arrives I will be prepared :)